2D Compositing for VFX explained
👁 35
https://blenderdumbass.org/ : 👁 2
https://www.google.com/ : 👁 4
https://blenderdumbass.org/articles : 👁 1
https://duckduckgo.com/ : 👁 1
https://vle.unikl.edu.my/ : 👁 1
https://search.brave.com/ : 👁 1
![[avatar]](/pictures/favicon.png) by Blender Dumbass
by Blender Dumbass
Aka: J.Y. Amihud. A Jewish by blood, multifaceted artist with experience in film-making, visual effects, programming, game development, music and more. A philosopher at heart. An activist for freedom and privacy. Anti-Paternalist. A user of Libre Software. Speaking at least 3 human languages. The writer and director of the 2023 film "Moria's Race" and the lead developer of it's game sequel "Dani's Race".
This is going to be a document that hopefully will explain 2D compositing to you, such that you will have an intuition for how it is done. ↩ Reply
2D compositing is used in visual effects for various things. The most famous type of 2D compositing would probably be chromakeying, or replacing a background in a piece of footage shot on a green-screen. ↩ Reply
![[embedded image]](https://upload.wikimedia.org/wikipedia/commons/d/dc/Myx_tv.jpg "Green Screen from Wikipedia")
But there are also things like: ↩ Reply
- Paint-outs of objects you don't want to have in the frame. ↩ Reply
- Compositing in elements that are shot separately. ↩ Reply
- Or even compositing 3D renders for CGI shots. ↩ Reply
Pre-computer compositing
Compositing didn't start on computers. As long as there was film, there was film trickery of some kind. So let's examine a few techniques early pioneers used to make their movies. ↩ Reply
Rear-Projection
![[embedded image]](/pictures/user_upload/blenderdumbass/monkeys_from_2001.jpg "A shot of monkeys from 2001 A Space Odyssey")
This shot, from 2001: A Space Odyssey by Stanley Kubrick is an example of a rear-projection shot. ↩ Reply
You have the monkey-people which are just actors in furry costumes. And you have a piece of rock and some ground on the foreground. But the trick is. Everything else, in the background is footage taken elsewhere. This is a studio shot. But it looks like we are somewhere in a desert. ↩ Reply
![[embedded image]](/pictures/user_upload/blenderdumbass/monkeys_from_2001_diagram.jpg "Diagram of the shot.")
There is big screen on the background, behind the actors, with a footage of the background projected onto it from the back, so that the actors would not make shadows on the screen. The camera is positioned on the other side, looking through the actors and the bits of set that are real, onto said screen. This creates an illusion that they are in the desert. ↩ Reply
![[embedded image]](/pictures/user_upload/blenderdumbass/rear_projection_oblivion.jpg "rear projection setup Oblivion")
This technique is so easy to use and gives such a convincing result that even modern movies use this technique. One good example, would be the 2013 Joseph Kosinski film Oblivion. Where they recorded high resolution high dynamic range 360 degree footage of the background and projected it onto a 270 degree wrap around screen. It gave Kosinski both the background and light of the scene. Had he used standard chromakeying for those scenes ( with glass and reflective surfaces everywhere ), it would have been a nightmare to composite later. While using rear projection allowed for the entire effect to be done, pretty much in camera. ↩ Reply
![[embedded image]](/pictures/user_upload/blenderdumbass/the_volume.jpg "The Volume")
In the modern day, using photo-realistic game-engine technology allows for some really cool uses of rear projection technology. Scenes could be rendered in real time and adjusted to the camera. Allowing the director and the camera operators to take rear-projection shots as if they are filming a regular set. While the background could be as "expensive", or fantastical as they want to. ↩ Reply
Matte Painting
Matte Painting is when the additional element is not behind the actor, but in front. Which is usually still used to make set-extensions and fake the background in some way. ↩ Reply
![[embedded image]](/pictures/user_upload/blenderdumbass/james_cameron_matte_painting.jpg "James Cameron's Matte Painting")
This is James Cameron doing a matte painting for the John Carpenter's 1981 film Escape from New York. The director wanted to see a particular type of skyline in the background of this shot. Which was not possible to shoot for real for one reason or another. So they brought an artist with very good painting skills ( in this case James Cameron ) to paint the sky-line onto a piece of glass. Shooting through this piece of glass, while the shot is perfectly aligned, makes a seamless effect. ↩ Reply
Obviously this technique has serious limitations. For instance, each of those shots require a skilled artist to paint a photo-realistic painting for each angle you want to shoot. The camera movement is limited only to simple pans. And you cannot use strong dept-of-field effects because your background is literally the closest thing to the camera. ↩ Reply
Today with digital painting software, such Matte Paintings are way easier. ↩ Reply
In Camera Compositing
A film camera ( not a digital camera ) is exposing a strip of film through its lens, which chemically alters said strip. This is why film is stored in a such a way as to make sure it will not be exposed to no light. If you open a box of fresh film, you will instantly ruin by exposing all of it to all of the light in the room. ↩ Reply
![[embedded image]](/pictures/user_upload/blenderdumbass/film_camera.jpg "diagram_of_film_camera")
A camera stores said film inside itself in total darkness. And only exposes it to the light coming from the lens for a split second. There is ( usually a mechanical ) shutter that quickly opens up and closes, allowing some light to quickly pass through. The lens is used to focus said light onto the piece of film for a sharp and crisp image. ↩ Reply
Here is a thing though. Turning on the camera in a totally dark room, or with a lens-cap firmly on the lens, will not actually use the film. Yes the film will mechanically go through the camera. But since there is an absence of light, none of said film will actually be exposed. Meaning you can re-use it. A very similar thing would happen if you are trying to take a shot of something completely black. ↩ Reply
![[embedded image]](/pictures/user_upload/blenderdumbass/masking_in_camera.jpg "Masking in camera")
So for example, you want to make a shot of the same actor twice in the same shot. Maybe you are making a movie about clones or something. You could cover half of the lens with some sort of dark material. This would make it so you are exposing only one half of the film. Then you crank that film back. And re-use it again. Exposing onto it the second time. This time thought, you move the dark material to the other side of the lens. That is how you can shoot different parts of the frame at different times. Allowing you to have the same actor multiple times in the same shot, or, if you are clever, to do other effects this way. ↩ Reply
For example, you can combine this technique with Matte Painting and draw a dark matte mask onto a piece of glass, to cover only a very particular part of the frame. And then you can use a reverse-mask ( a matte painting where the black and transparent parts are reversed ) to expose the other element into the shot. ↩ Reply
Which brings us to... ↩ Reply
Optical Printers
Imagine you want to distribute a movie back before computers could handle it. At the time where everything was done on film. You shot your film. You physically cut it and glued it together into a strip of watchable material. Now you need to make distributable copies of this film. How would you do that? ↩ Reply
![[embedded image]](https://upload.wikimedia.org/wikipedia/commons/thumb/0/02/Opticalprinter3.jpg/960px-Opticalprinter3.jpg "Optical Printer")
Well, you would point a projector with said film, onto a movie camera. This arrangement is called an "optical printer". If your focusing is good and the things are aligned properly, you might even have a very good copy. Though often copies lose some quality. It is very hard to focus light from one strip of film onto another. Therefore if you see an optical printer shot, it is usually a bit blurrier than the rest of the movie. ↩ Reply
But now think about what you actually have here. You have a camera that is looking at a pre-recorded piece of footage. That means you can stick matte masks in between the projector and the camera, to do something similar to the in-camera compositing, but this time with way more control. ↩ Reply
For example, instead of using a glass with a painted mask on it. You can use a third strip of film. The white parts on an image, are just transparent parts on the piece of film. They let all of the light from the projector through. While black parts on the image are completely opaque on the film. They block all the light. This is literally the same idea as with a matte mask painted of a piece of glass. But with a running strip of film you can have an animated mask, which would allow for some rather complex shots. ↩ Reply
Early Blue Screen
![[embedded image]](/pictures/user_upload/blenderdumbass/Star_wars_blue_screen.jpg "Star Wars Blue Screen")
Here is something rather interesting. On the original Star Wars ( from late 70s and early 80s ) they were already using a Blue Screen. But computers still weren't good enough, at this point, to handle digital compositing. So how did this work? ↩ Reply
Well if you calibrate the color of the Blue Screen precisely, you can pass the film through an optical printer, to make a "copy" of it. But you pass the light through a blue filter that matches the color of the blue screen exactly. It will block any other wavelength of light ( or any other color ). And it would give you a piece of film that looks somewhat like this. ↩ Reply
![[embedded image]](/pictures/user_upload/blenderdumbass/Star_wars_blue_screen_matte_01.jpg "Blue Screen Matte image.")
Notice how the Blue Screen part of the frame is totally white, while anything else is darker. The farther away the color is from this blue, the darker it is. Yet, if you would try to use this as a mask, you would have a ghostly effect, because most of the image is still too bright. ↩ Reply
![[embedded image]](/pictures/user_upload/blenderdumbass/Star_wars_blue_screen_matte_02.jpg "Blue Screen Matte, but higher contrast")
What you can do though, is increase the contrast of the film, by exposing it longer in the optical printer, or by developing it longer, later. If you time it precisely you might get a very good black and white mask, useful for optical-printer compositing. You can pass this mask once more through the optical-printer to get a Negative of it ( where the white and the black parts are flipped ), and use them to make your effect. ↩ Reply
You will pass the background footage onto a new piece of film, through the mask where the white parts are the background. Leaving unexposed film, where it is black on the mask. And then you will pass the film though again, this time using the negative mask, to expose the foreground element, from the blue-screen shot. And here you go, you get yourself a blue screen compositing shot, using just optics, chemistry and mechanics. No computers needed. ↩ Reply
Obviously, if you need to, you can hand animate a piece of mask and use that. Or use multiple masks, say to remove the operator from the shot. One mask will be done chemically by extracting the blue-screen. The other painted by hand. If you are clever, you can use the optical printer for a variety of cool effects. ↩ Reply
Modern Compositing
During the digital visual effects revolution of the late 80s and early 90s, a lot of effort was put into the compositing software, to make it familiar to the artists who previously used optical printers. Similarly to how computer operating systems have concepts like "desktop", "folders" and "files" to make it easier to understand how to use them, so is the visual effect software. You still have a "cutting" tool in video editing ( usually represented with an icon of a razor ), even though nobody "cuts" film on a computer. And in compositing software you still have a concept of a mask. Or a black and white image that governs how two elements are going to be mixed with one another. ↩ Reply
Channels
![[embedded image]](/pictures/user_upload/blenderdumbass/Honda_Image_with_shadow.png "Honda transparent")
Take for example this render of the Honda Civic that I talk about in an article about VFX. ↩ Reply
This is a digital image with transparent parts. But if you look into the file, you will see 4 color channels. 4 masks, so to speak. Each doing it's own very important role. ↩ Reply
![[embedded image]](/pictures/user_upload/blenderdumbass/4_channels.png "4 channels")
As you can see there is a mask for each of the primary colors Red Green and Blue. In memory it is just a black and white mask. But I also drew it for you with the color, so it will be easier to understand what is going on. Basically the Red ( or R ) channel represents how red something is. G how green and B how blue. And there is another channel in this image. A ( or Alpha ) that represents its mask, when you want to composite this image onto another image. This represents the so called transparency of the image. ↩ Reply
![[embedded image]](https://upload.wikimedia.org/wikipedia/commons/thumb/9/91/Venn_diagram_rgb.svg/960px-Venn_diagram_rgb.svg.png "RGB mixing")
If you add Red Green and Blue together you get white. Just red and green, gives you yellow. Just green and blue gives you cyan. And just blue and red, gives you magenta. You can imagine that adjusting the values of all 3 by varying the brightness of each of them, can give you the entire pallet of colors in between. The alpha channel is then applied as the regular mask, kind of like in the optical printer. To let the computer know where the color of be picture "below" it could be shown instead. ↩ Reply
Layers
In the optical printer you could technically layer multiple elements, passing the image through multiple times. In the computer this is usually done using layers. ↩ Reply
![[embedded image]](/pictures/user_upload/blenderdumbass/layers.jpg "Layers in GIMP")
This is what the layers selector in GIMP looks like. Layers are multiple images with an alpha channel stacked one on top of another. But they are not necessarily mixed using the alpha channel as the mask. ↩ Reply
Mixing modes
Because the color channels are stored as numerical data on the computer ( usually black to white is 0 to 1, with gray being 0.5 ) you can do more than just regular masking when compositing images together. ↩ Reply
![[embedded image]](/pictures/user_upload/blenderdumbass/mixing_modes.jpg "Mixing modes menu.")
Usually the "Normal" mode of mixing will use the alpha channel mask. But you can also have multitudes of other options ( they might be different dependent on the software ). But often you will have things like: ↩ Reply
- Screen - simulates two film strips projected onto the same screen without any masking. ↩ Reply
- Add - mathematically adding the values of light from two images. Looks similar to Screen. ↩ Reply
- Multiply - multiplying the value of one image by the values of another. If using standard black to white ( 0 to 1 ) range of brightness, it usually darkens one images by the other. A kind of anti-screen effect. ↩ Reply
- Difference - creates a sort of mask where bright parts represent a lot of difference in color between two images. While dark parts represent similar colors. ↩ Reply
And so on an so forth... ↩ Reply
Take into account that some image formats can store color data outside of black to white range. Meaning there are colors brighter than white and darker than black. This is done by storing numerical values that could be lower than 0 or larger than 1. Those images are usually called "High Dynamic Range". And are usually stored in formats such as HDR or EXR. Doing Add or Multiply operations using those types of images might give you slightly unexpected results. ↩ Reply
Compositing 3D data
When working in 3D software such as Blender, you can generate various useful maps for compositing, beyond just simple alpha channel. Inside of Blender under the view-layer properties you can see it gives a lot of options to choose from that you can enable. ↩ Reply
![[embedded image]](/pictures/user_upload/blenderdumbass/blender_passes.jpg "Blender Passes Menu")
Rendering them all out I can show you roughly speaking what those maps look like ( keep in mind that most of them use the High Dynamic Range color space, which means you will see only some of the data, like this, in this preview, in the browser ). ↩ Reply
![[embedded image]](/pictures/user_upload/blenderdumbass/blender_passes_rendered.jpg "Blender Passes Rendered")
As you can see we have things like: ↩ Reply
- Combined - or the render of the image itself. ↩ Reply
- Depth - also called Z sometimes. It encodes the distances of each part of the image from the camera. They are usually stored in meters. So you will see only things closer than 1 meter away. Because more than 1 meter away it will use brighter than white colors to represent the distance. But as you can see I normalized the Depth for this preview squishing the data such that the furthest possible part will be white. ↩ Reply
- Position - encoding X, Y and Z location of each point into R, G and B channels ( in meters ). ↩ Reply
- Normal - encoding the direction into which each surface is facing. Again mapping XYZ to RGB. ↩ Reply
- UV - the 2D position of each point on their respective textures. ↩ Reply
- Diffuse - The non-glossy surfaces light calculation. Direct for direct hits of light. Indirect for bounce light from other object. And the color of diffused materials. ↩ Reply
- Gloss - Same thing as with Diffuse but for Glossy materials. ↩ Reply
- AO - or Ambient Occlusion. Simulates the darkening of areas, where it is hard to get for the light. Also somewhat simulates proximity between objects. ↩ Reply
- Albedo - the color information of what the scene would look like without any materials or light. ↩ Reply
As you can see a lot of those things are very useful things. For example the Z-Depth buffer could be used as a mask to insert elements into the scene. You could adjust it's brightness and contrast to get a mask at a certain distance from the camera, to place an element into that location. ↩ Reply
Node based compositing
Layers are cool and all but they could be a little too tedious when you want to composite moving images. Therefore for more complex compositing jobs, Nodes are usually the best option. ↩ Reply
![[embedded image]](/pictures/user_upload/blenderdumbass/compositing_nodes.jpg "Compositing Nodes")
With nodes you basically setup a sort of system that could be reused for multiple frames of the same shot. It will do the same exact set of operations for every next frame in your video. ↩ Reply
![[embedded image]](/pictures/user_upload/blenderdumbass/basic_node_setup.jpg "Basic Node Setup")
In Blender specifically the nodes are going from left to right. On the left you have your input values. In this case the input image is the frame from star wars with the blue screen. On the right you have the output. You see this image is connected to two outputs. One is called "Composite", this would be the rendered image when you hit render. And the other one is called "Viewer", this is a preview node. Whatever you plug into it, you will see on the background under the nodes. And you can see the background shows the exact image I stuck that was inputted on the left. ↩ Reply
![[embedded image]](/pictures/user_upload/blenderdumbass/separate_RGBA.jpg "Separating RGBA")
Here for example I added a Separate Color node that lets me use any of the color channels independently. ↩ Reply
![[embedded image]](/pictures/user_upload/blenderdumbass/difference_map_Blue_screen.jpg "Difference")
Here I use a mix node with the Difference mode to get a difference map between the image and the color blue ( used for the blue-screen ). ↩ Reply
![[embedded image]](/pictures/user_upload/blenderdumbass/difference_map_Blue_screen_mask.jpg "Color Ramp")
Then using a color ramp I can add contrast to the difference map, and we get a descent looking mask. ↩ Reply
![[embedded image]](/pictures/user_upload/blenderdumbass/primitive_blue_screen.jpg "Primitive Blue screen")
I can then use the mask as a factor ( or mask ) when mixing between the original image and a black color ( for space is black ) and you get a primitive blue screen effect. ↩ Reply
![[embedded image]](/pictures/user_upload/blenderdumbass/using_the_keying_node.jpg "The dedicated Keying node")
Of course Blender has a dedicated node specifically for chromakeying called Keying which already pre-built with a lot of useful features. And which usually does a very good job, generating a clean image with an alpha channel. ↩ Reply
Notice I use an Alpha Over node instead of the Mix Node to add this image onto the black background this time. Alpha Over node is another one of those smart nodes that is designed to simplify your life a little bit. ↩ Reply
As you can see the Keying node was not only able to cut out the blue part accurately. But also was able to reduce the overall blueness of the image. When you shoot on a blue-screen ( or a green-screen ) the color of the screen will often be reflected in the objects you are shooting. This node does some color-correction for your to reduce this "color spill". ↩ Reply
Usually, though, you will still need to pass the color through some color correction steps before you can attach it to the background. ↩ Reply
Common Tools
Let's go over some tools that are very useful. ↩ Reply
![[embedded image]](/pictures/user_upload/blenderdumbass/RGB_Curves.jpg "RGB curves")
RGB Curves ( also known as Color Curves ) are very useful for light color correction and adjustment of brightness and contrast. ↩ Reply
You can see a diagonal line. This represents the graph that will alter the brightness values of your image. The X axis ( horizontal ) represent the input brightness. And the Y value ( vertical ) represents the output brightness. If the line goes straight from one corner to another, it means black is mapped to black and white is mapped to white. And there is no difference at all. ↩ Reply
![[embedded image]](/pictures/user_upload/blenderdumbass/RGB_Curves_contrast.jpg "RGB curves, more contrast")
But if I do something like this, for example, it will increase the contrast. Because I tell the software to lower the brightness for the dark parts and make bright parts brighter. That is to say, to increase contrast. ↩ Reply
![[embedded image]](/pictures/user_upload/blenderdumbass/RGB_Curves_Flipped.jpg "Flipped Curves")
Flipping the line entirely, will create a negative of the image. The bright parts are now mapped to the dark parts and dark parts to the bright parts. ↩ Reply
As you can see, with RGB curves you can adjust individual color channels too, controlling the color balance of the image very precisely. ↩ Reply
![[embedded image]](/pictures/user_upload/blenderdumbass/color_ramp.jpg "Color Ramp")
Color Ramp is another way of mapping brightness of the image to something else. In this case, on the screenshot, you can see that darkness is mapped to black and brightness to white. This gives us a black and white version of the image. ↩ Reply
![[embedded image]](/pictures/user_upload/blenderdumbass/color_ramp_contrast.jpg "Adding contrast with Color Ramp")
By moving the black and the white colors around, you can adjust the contrast of the image. For example, on this screenshot the black is moved more into the center. Meaning all colors that are darker than its position on the ramp, will be black. And only brighter colors will now start moving towards white. ↩ Reply
![[embedded image]](/pictures/user_upload/blenderdumbass/color_ramp_colors.jpg "Color Ramp Colors")
Or you can go completely insane and map each brightness level to its own color. Making a strange kind of surreal effect. ↩ Reply
Using color separate node you can input into the color ramps not just the brightness values, but other things as well. Like you can plug the saturation of the image into the color ramp. Or the hue. And then you can combine the channels together in the end, creating some interesting effects. ↩ Reply
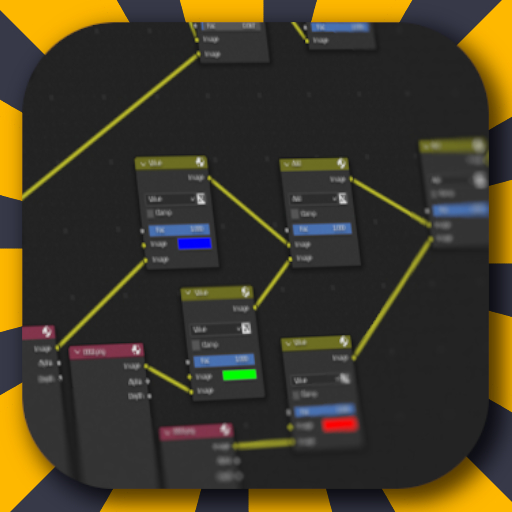
Example of a composited frame
![[embedded image]](/pictures/user_upload/blenderdumbass/compositing_star_wars_after_the_car.jpg "Compositing example Nodes")
In this example I have composited the blue screen element ( from Star Wars ) into the 3D scene I rendered earlier. As you can see it has 3 input images. ↩ Reply
- The blue screen element shot. ↩ Reply
- The car render. ↩ Reply
- The normalized Z-Depth buffer of the 3D scene with the car. ↩ Reply
Then I use a Color Ramp node on the Z-Depth image, to create a mask of the car. Anything further ( brighter ) than the car becomes black. And anything closer, becomes white. ↩ Reply
I flip the blue-screen image on the X axis by scaling it by -1. This way the spaceship is now on the right side of the frame. Then I plug it into the Keying node, which removes the blue screen from it. ↩ Reply
I overlay the spaceship footage over the render of the car with the Alpha Over node first. And then I overlay the render back onto the image using the mask I made from the Z-Depth. And so the result is, it looks like the spaceship is coming from behind the car. ↩ Reply
Custom Masks ( Rotoscoping )
In the pre-computer era, there was always an option of painting the masks needed for the optical-printer compositing by hand. For example, a frame ( of multiple frames ) from the movie, could be printed out on large piece of material, or projected onto said material from behind. Allowing artists to hand-paint a mask using said frame as a reference. Then photographing this painting in the proper conditions, with proper exposure and alike, would give you the desired film mask. ↩ Reply
This could be useful for things that are hard to get a key from. Say you want to composite a stop motion animated monster into a live action shot. But you need to put said monster in between objects. There is no blue screen. You will have to make said mask manually. ↩ Reply
On the computer you could also draw or render masks manually. But computer software usually provides people with some tools to make this sort of job easier. ↩ Reply
![[embedded image]](/pictures/user_upload/blenderdumbass/lasso_tool_GIMP.jpg "Lasso Tool GIMP")
For example in GIMP you have the Free Select Tool ( known also as the Lasso Tool ) which allows you to simply draw ( so to speak ) the boundaries of your mask, straight on the image. This "selection" in the end of the day, is just a temporary mask inside of GIMP, which is then applied to any next operation you do. ↩ Reply
![[embedded image]](/pictures/user_upload/blenderdumbass/Lasso_tool_blender.jpg "Lasso Tool Blender")
Inside of Blender you also have a Lasso Tool ( in the Movie Clip Editor window ), but unlike GIMP, this mask is not temporary, and the points of said mask are animate-able. Which means you can make a moving piece of mask useful in the Compositor. In the industry, this sort of manual masking is called "Rotoscoping". ↩ Reply
Custom masks in combination with chromakeying are very useful. For example if you remember the frame from Star Wars it has a lot of stuff that we don't need. The stand, on which the model is mounted. The operator in shot. All of this could be masked out in a quick and dirty way. And then the rest could be handled by the chromakeying. ↩ Reply
![[embedded image]](https://upload.wikimedia.org/wikipedia/commons/thumb/6/66/SpiderwickChroniclesSet.jpg/960px-SpiderwickChroniclesSet.jpg "Blue Screen with dots")
Especially today, with the need for 3D tracking, the blue / green screen itself is usually not very clean. It usually has little tracking dots all across its surface, requiring some level of garbage matting anyway. ↩ Reply
Tracking
Which finally brings us to Tracking. ↩ Reply
Modern Visual Effect software usually has a feature that lets you track certain features across multiple frames of video. You select what features you want to track and the software automatically finds the most similar looking thing in the next frame. And then the next frame. And so on and so forth. It is useful for so many things. ↩ Reply
Having at least 8 of those points allows you to run a trigonometric algorithm on said movement, which could re-create the full movement of the camera in 3D space. This is very useful if you want to composite 3D ( or even 2D elements ) into a shot with a moving camera. ↩ Reply
But even if you don't want to do something that complex, tracking a single ( or a few ) point(s) is also useful for compositing. For example, you can attach various elements to those points, so those elements would move with the footage. And with a few points you can even distort your element. ↩ Reply
For example it could be useful to composite signs onto walls. Or things on the screen into footage where there is nothing on those screens. Usually in Hollywood they shoot screen with nothing on them. Maybe with a green or blue light ( so you could more easily get a mask of the screen's shape ). But if the camera is moving. So should also be image on said screen. So some form of tracking is usually used to achieve this. ↩ Reply
Happy Hacking!!! ↩ Reply
Find this post on Mastodon
![[thumbnail]](/pictures/thumbs/vfx_honda_2.png)
![[thumbnail]](/pictures/thumbs/cgi_vfx_part3.png)
![[thumbnail]](/pictures/thumbs/box_office_poison.png)
![[thumbnail]](/pictures/thumbs/building_108.jpg)
![[thumbnail]](/pictures/thumbs/CGI_cars_michael_bay.jpg)
![[thumbnail]](/pictures/thumbs/vfx_honda.png)
![[thumbnail]](https://upload.wikimedia.org/wikipedia/en/thumb/4/4f/The_Audition_%282015_film%29.jpg/250px-The_Audition_%282015_film%29.jpg)
![[thumbnail]](/pictures/thumbs/pitch_vfx_shot_4.jpg)
![[thumbnail]](/pictures/thumbs/Blender_Assets_tab.jpg)
![[thumbnail]](https://upload.wikimedia.org/wikipedia/en/4/4e/Hundreds_of_Beavers.png)
![[thumbnail]](https://upload.wikimedia.org/wikipedia/en/thumb/a/af/Wrath-of-man.jpg/220px-Wrath-of-man.jpg)
![[thumbnail]](/pictures/user_upload/Troler/NGWJ6K0NF96N3RYQ.png)
![[avatar]](/pictures/user_upload/Troler/55NKGQKE7IRKMLHV.png)